Showing posts with label Windows Vista Tips and Tricks. Show all posts

Windows Vista Service Pack 2 Beta Released (Download Link Included)

Windows Vista introduces a breakthrough user experience and is designed to help you feel confident in your ability to view, find, and organize information and to control your computing experience.

The visual sophistication of Windows Vista helps streamline your computing experience by refining common window elements so you can better focus on the content on the screen rather than on how to access it. The desktop experience is more informative, intuitive, and helpful. And new tools bring better clarity to the information on your computer, so you can see what your files contain without opening them, find applications and files instantly, navigate efficiently among open windows, and use wizards and dialog boxes more confidently.
Related :

Top 9 Tweaks, Tips, and Tricks for Windows Vista

  1. If you’re annoyed by Internet Explorer’s incessant barking that you’ve lowered your security settings (like, if you’re a non-paranoid expert), launch “gpedit.msc” from either the Run command or Start Search field, navigate through Local Computer Policy / Computer Configuration / Administrative Templates / Windows Components / Internet Explorer. In the rightmost pane, double-click “Turn off the Security Settings Check feature” and set it to Enabled.

  2. If Internet Explorer’s Information Bar also annoys you, you can turn it off (again) in the Group Policy Object Editor (gpedit.msc) through Local Computer Policy / Computer Configuration / Administrative Templates / Windows Components / Internet Explorer / Security Features. In the rightmost pane, double-click “Internet Explorer Processes” and set it to Disabled. Sweet!

  3. Read the Background on Backgrounds if you’re a performance junkie. Don’t set your wallpaper through Internet Explorer ever again! Now that Windows supports JPG wallpapers, there’s absolutely no need (or excuse) for using BMPs anymore.

  4. If you insist on keeping UAC (User Account Control) turned on for yourself, you might care to make the elevation prompts a bit less visually jarring. Brandon told me about this one, even though I have UAC turned off. Launch the Local Security Policy manager (secpol.msc), and navigate through Security Settings / Local Policies / Security Options. In the rightmost pane, scroll to the bottom and double-click “User Account Control: Switch to the secure desktop when prompting for elevation.” Disable it, and you can keep UAC turned on without getting turned off by the embarrassingly craptacular Aero Basic theme.

  5. Vista can send you emails! The Computer Management tool can still be accessed by right-clicking “Computer” and selecting “Manage” from the menu. However, now you can attach a task to any event. Try navigating through System Tools / Event Viewer / Windows Logs / Application. Now, go ahead and select an event - then look to the rightmost pane and click “Attach Task to This Event.” Name it whatever, describe it however, click through the next step, then in the Action step, you’ll see the “Send an e-mail” option.

  6. The Windows Task Manager gives you a lot more troubleshooting information in Vista. Flip to the Processes tab, and in the View menu, click “Select Columns” and add Description, Command Line, and Image Path Name. Moreover, when you right-click a process, you can select either “Go to Service(s)” or “Open File Location.” These are all long overdue options.

  7. This one’s interesting. Open up the Date and Time Control Panel applet. Flip to the “Additional Clocks” tab. There, you can configure two more clocks from different time zones. They’ll appear in the tooltip when you hover over the Taskbar clock. No additional software (or silly sidebar widgets) necessary.

  8. Applicable in other versions of Windows, I’m going to throw it in here for good measure. Create a shortcut to RegSvr32.exe in your SendTo folder. To get there quickly, enter “shell:sendto” in the Run command dialog or Start Search field. Now, when you wanna register a DLL or OCX file with the system, you can select it/them and “Send To” the RegSvr32 shortcut.

  9. I figured I’d round out my first set of Windows Vista tips and tricks with a tiny bit of eye candy. It doesn’t beat Picasa, but the Windows Photo Gallery is better than nothing. Once it’s indexed all your photos, click the icon next to the Search field and turn on the “Table of Contents.” That’s kinda nifty.

Disable Shortcut Icon Arrow Overlay in Windows Vista

The shortcut icons in Windows Vista have Huge arrows on them. If you are worried about the look of your desktop, you may not want to see the ugly arrows. Here's some before and after pictures so you'll know what to expect:

Default:


Shortcut Arrow Removed:

Note: Because so many people have written in about problems with the registry tweaks, I'm going to suggest that you use the FrameworkX application first, and I'm removing the registry tweaks from this page.

Preferred Method: Using Vista Shortcut Overlay Remover utility

You can download a small, free utility from Frameworkx.com that will easily let you remove the shortcut arrows without having to do any registry patches. See how easy it is:

Remove Optional and Probably Unnecessary Windows Vista Components

In the never-ending quest to rid your computer of unnecessary bloat, Windows Vista has a lot less options than prior versions, but you can still get rid of some of the extra Windows components that you don't need.
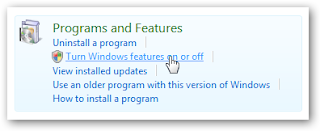
Open up Control Panel and go to the Programs and Features section. Find the link for "Turn Windows features on or off" (or you could just search for it)


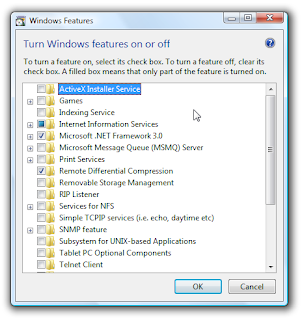
This dialog is quite self-explanatory… uncheck the things you don't want, and hit the OK button. Depending on the version of Vista you are running you might not see everything in the list.


Guidelines, Not Set In Stone

Just to get you started, here's a few tips on what an average user might want to enable or disable. The rules will be different for everybody, depending on your applications and needs, so don't take these as absolute.
  • ActiveX Installer Service
    No
    Do you really want anything to do with ActiveX?

  • Games
    Why Not
    Your productivity can only increase with Spider Solitaire on your computer.

  • Indexing Service
    No
    This is the old indexing service that is no longer needed in Vista.

  • Internet Information Service
    No
    Used for hosting websites on your computer.

  • Microsoft .NET Framework 3.0
    No
    Used for the new .NET 3.0 components, but only really needed for programmers.

  • Microsoft Message Queue (MSMQ) Server
    No
    Used by programmers as a way to reliably queue messages.

  • Print Services
    No
    You only need this if you use internet printers and like to kill trees. Our rainforests are depending on you disabling this service.

  • Remote Differential Compression
    Maybe
    This is likely required for utilities that use the network to download files. If it is enabled, don't mess with it.

  • Removable Storage Management
    No
    The only reason you'd need this is if you are restoring from old NTBACKUP files.

  • RIP Listener
    No
    You won't need this, it's a routing protocol.

  • Services for NFS
    No
    This can be used to map a drive to a linux NFS server. Unlikely you'd need it since Samba works so well.

  • SNMP Feature
    No
    This is used for management systems in workplace networks. You don't need it.

  • Subsystem for UNIX-based Applications
    No
    This is used for compatibility with certain applications based on UNIX… you don't need it.

  • Tablet PC Optional Components
    Maybe
    If you have a Tablet PC, you should enable this. If you don't, you may still want to because this includes the Snipping Tool.

  • Telnet Client
    AVOID
    You should never use telnet. Ever.

  • Telnet Server
    AVOID
    You should never use telnet. Ever.

  • TFTP Client
    AVOID
    TFTP was used by many of the early internet worms… there's a reason it's disabled by default.

  • Windows DFS Replication Service
    No
    This is only really used in work environments. Don't bother with this if you are a home user.

  • Windows Fax and Scan
    No
    Why anybody still faxes anything is beyond me.

  • Windows Meeting Space
    No
    If you don't use Windows Meeting Space or the "People Near Me" feature, don't bother with this.

  • Windows PowerShell
    No
    PowerShell is a more advanced command line geared towards programmers and system administrators.

  • Windows Process Activation Service
    Probably
    This is likely required to support some .NET applications, so I wouldn't change whatever it's currently set to.

  • Windows Ultimate Extras
    Maybe
    If you like the extras, then enable them. (Ultimate Only)
Hopefully this will help somebody!

What is svchost.exe And Why Is It Running?

You are no doubt reading this article because you are wondering why on earth there are nearly a dozen processes running with the name svchost.exe. You can't kill them, and you don't remember starting them… so what are they?

So What Is It?

According to Microsoft: "svchost.exe is a generic host process name for services that run from dynamic-link libraries". Could we have that in english please?

Some time ago, Microsoft started moving all of the functionality from internal Windows services into .dll files instead of .exe files. From a programming perspective this makes more sense for reusability… but the problem is that you can't launch a .dll file directly from Windows, it has to be loaded up from a running executable (.exe). Thus the svchost.exe process was born.

Why Are There So Many svchost.exes Running?

If you've ever taken a look at the Services section in control panel you might notice that there are a Lot of services required by Windows. If every single service ran under a single svchost.exe instance, a failure in one might bring down all of Windows… so they are separated out.

Those services are organized into logical groups, and then a single svchost.exe instance is created for each group. For instance, one svchost.exe instance runs the 3 services related to the firewall. Another svchost.exe instance might run all the services related to the user interface, and so on.

So What Can I Do About It?

You can trim down unneeded services by disabling or stopping the services that don't absolutely need to be running. Additionally, if you are noticing very heavy CPU usage on a single svchost.exe instance you can restart the services running under that instance.

The biggest problem is identifying what services are being run on a particular svchost.exe instance… we'll cover that below.

If you are curious what we're talking about, just open up Task Manager and check the "Show processes from all users" box:


Checking From the Command Line (Vista or XP Pro)

If you want to see what services are being hosted by a particular svchost.exe instance, you can use the tasklist command from the command prompt in order to see the list of services.
tasklist /SVC

The problem with using the command line method is that you don't necessarily know what these cryptic names refer to.

Checking in Task Manager in Vista
You can right-click on a particular svchost.exe process, and then choose the "Go to Service" option.

This will flip over to the Services tab, where the services running under that svchost.exe process will be selected:


The great thing about doing it this way is that you can see the real name under the Description column, so you can choose to disable the service if you don't want it running.

Using Process Explorer in Vista or XP

You can use the excellent Process Explorer utility from Microsoft/Sysinternals to see what services are running as a part of a svchost.exe process.

Hovering your mouse over one of the processes will show you a popup list of all the services:

Or you can double-click on a svchost.exe instance and select the Services tab, where you can choose to stop one of the services if you choose.


Disabling Services

Open up Services from the administrative tools section of Control Panel, or type services.msc into the start menu search or run box.

Find the service in the list that you'd like to disable, and either double-click on it or right-click and choose Properties.


Change the Startup Type to Disabled, and then click the Stop button to immediately stop it.


You could also use the command prompt to disable the service if you choose. In this command "trkwks" is the Service name from the above dialog, but if you go back to the tasklist command at the beginning of this article you'll notice you can find it there as well.

sc config trkwks start= disabled

Hopefully this helps somebody!

Enable Hidden BootScreen in Windows Vista

The Windows Vista BootScreen is pointless, but Microsoft decided to hide a more visually appealing boot screen that can easily be enabled with very little trouble. I'm not sure why they didn't make the boot screen better.

If you really want a better boot screen, you can check out my article on creating a custom boot logo.

Here's the default boot screen:


And here's the hidden one, called "Aurora"


All you have to do is type msconfig into the start menu search box, and hit enter.


Click the Boot tab, and then check the "No GUI boot" checkbox.


Hit OK and reboot the computer. You should see the new boot screen immediately.

Note: You may get a Windows Defender error on the next startup. You can enable the system config utility using the tray icon and this error will go away. (http://www.howtogeek.com/)

Create a Custom Boot Logo for Windows Vista

NOTE: THIS DOES NOT WORK WITH VISTA SP1. IF YOU ATTEMPT THIS IN SP1, YOU WILL NOT BE ABLE TO BOOT YOUR COMPUTER.

If you are a desktop customization kinda guy, one of the first things you'll want to figure out is how to create a customized boot logo. There's a little utility that you can use to create the boot logo formats.

DO NOT DOWNLOAD THIS UTILITY IF YOU HAVE VISTA SP1

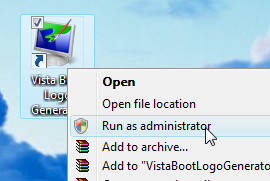
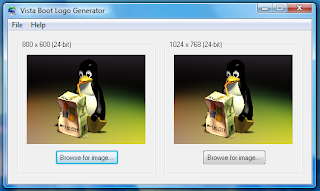
First you'll need to download the Vista Boot Logo Generator 1.1 utility, which we'll use to create the correct logo image type. Once it's installed, you need to make sure that you run the application as administrator:


We should choose an appropriate logo file. Since I'm a big fan of linux, and not as big a fan of Windows Vista, I chose an image of Tux making windows suck that I found over here.


Choose two versions of the image, one needs to be 800×600 at 24 bit color, and the other 1024×768 at the same color depth. Both files must be in Bitmap(BMP) format. Save the file somewhere like your desktop, because we can't yet copy directly to the correct directory, until we take ownership of the file.

To take ownership of the file, you'll have to open an administrator command prompt. (type cmd into the start menu search box, and hit Ctrl+Shift+Enter), and then run this command:

takeown /f C:\Windows\System32\en-US\winload.exe.mui

Now run this command, substituting geek for your username:

cacls C:\Windows\System32\en-US\winload.exe.mui /G geek:F

Now copy the file that you created into the C:\windows\system32\en-US\ directory. Make sure you choose the overwrite option.

Now you'll need to use the msconfig utility. Just type msconfig into the start menu search box, and then click the Boot tab:


Check the "No GUI boot" option, and we're all ready to reboot and test it out. Sweet!
(http://www.howtogeek.com/)

Customize Your Windows Vista Logon Screen

For those of us looking to customize the Windows Vista UI experience, there's nothing more annoying than seeing the default logon screen every time you start up your computer, or when you lock your workstation. Thankfully the nice folks at Stardock have created a free utility to replace the logon screen with any wallpaper you choose.
All you have to do is download and install the utility, and click the apply button to immediately see the changes. (It will lock your computer to show you, so you'll have to use your password to unlock it)

The utility is remarkably easy to use, just click on an entry in the list, and use the Apply button to select it. The download button will take you to the directory of logon screens on WinCustomize.

You can also click the Create button and choose any image you want. For instance, if you wanted to have the logon screen match your desktop wallpaper, just choose the wallpaper using the browse button.

You can then save the wallpaper as a logon screen file and even share it with other people on WinCustomize.
Download LogonStudio from Stardock (Free)

5 ways to speed up your PC

By following a few simple guidelines, you can maintain your computer and keep it running smoothly. This article discusses how to use the tools available in Windows XP Service Pack 2 (SP2) and Windows Vista to more efficiently maintain your computer and safeguard your privacy when you're online.

Free up disk space

By freeing disk space, you can improve the performance of your computer. The Disk Cleanup tool helps you free up space on your hard disk. The utility identifies files that you can safely delete, and then enables you to choose whether you want to delete some or all of the identified files.Use Disk Cleanup to:

•Remove temporary Internet files.
•Remove downloaded program files (such as Microsoft ActiveX controls and Java applets).
•Empty the Recycle Bin.
•Remove Windows temporary files.
•Remove optional Windows components that you don't use.
•Remove installed programs that you no longer use.

Tip: Typically, temporary Internet files take the most amount of space because the browser caches each page you visit for faster access later.

To use Disk Cleanup

1.Click Start, point to All Programs, point to Accessories, point to System Tools, and then click Disk Cleanup. If several drives are available, you might be prompted to specify which drive you want to clean.


2.In the Disk Cleanup for dialog box, scroll through the content of the Files to delete list.
Choose the files that you want to delete.


3.Clear the check boxes for files that you don't want to delete, and then click OK.

4.When prompted to confirm that you want to delete the specified files, click Yes.

After a few minutes, the process completes and the Disk Cleanup dialog box closes, leaving your computer cleaner and performing better.

Speed up access to data

Disk fragmentation slows the overall performance of your system. When files are fragmented, the computer must search the hard disk when the file is opened to piece it back together. The response time can be significantly longer.

Disk Defragmenter is a Windows utility that consolidates fragmented files and folders on your computer's hard disk so that each occupies a single space on the disk. With your files stored neatly end-to-end, without fragmentation, reading and writing to the disk speeds up.

When to run Disk Defragmenter

In addition to running Disk Defragmenter at regular intervals—monthly is optimal—there are other times you should run it too, such as when:

•You add a large number of files.
•Your free disk space totals 15 percent or less.
•You install new programs or a new version of Windows.

To use Disk Defragmenter:

1.Click Start, point to All Programs, point to Accessories, point to System Tools, and then click Disk Defragmenter.

Click Analyze to start the Disk Defragmenter.


2.In the Disk Defragmenter dialog box, click the drives that you want to defragment, and then click the Analyze button. After the disk is analyzed, a dialog box appears, letting you know whether you should defragment the analyzed drives.

Tip: You should analyze a volume before defragmenting it to get an estimate of how long the defragmentation process will take.

3.To defragment the selected drive or drives, click the Defragment button. Note: In Windows Vista, there is no graphical user interface to demonstrate the progress—but your hard drive is still being defragmented.
After the defragmentation is complete, Disk Defragmenter displays the results.

4.To display detailed information about the defragmented disk or partition, click View Report.

5.To close the View Report dialog box, click Close.

6.To close the Disk Defragmenter utility, click the Close button on the title bar of the window.

Detect and repair disk errors

In addition to running Disk Cleanup and Disk Defragmenter to optimize the performance of your computer, you can check the integrity of the files stored on your hard disk by running the Error Checking utility.

As you use your hard drive, it can develop bad sectors. Bad sectors slow down hard disk performance and sometimes make data writing (such as file saving) difficult, or even impossible. The Error Checking utility scans the hard drive for bad sectors, and scans for file system errors to see whether certain files or folders are misplaced.

If you use your computer daily, you should run this utility once a week to help prevent data loss.

To run the Error Checking utility:

1.Close all open files.

2.Click Start, and then click My Computer.

3.In the My Computer window, right-click the hard disk you want to search for bad sectors, and then click Properties.

4.In the Properties dialog box, click the Tools tab.

5.Click the Check Now button.

6.In the Check Disk dialog box, select the Scan for and attempt recovery of bad sectors check box, and then click Start.


7.If bad sectors are found, choose to fix them.

Tip: Only select the "Automatically fix file system errors" check box if you think that your disk contains bad sectors.

Protect your computer against spyware

Spyware collects personal information without letting you know and without asking for permission. From the Web sites you visit to usernames and passwords, spyware can put you and your confidential information at risk. In addition to privacy concerns, spyware can hamper your computer's performance. To combat spyware, you might want to consider using Microsoft Windows Defender, which is included in Windows Vista, and is available as a free download for Microsoft XP SP2. Alternatively, there are other free anti-spyware software programs available.

Learn all about ReadyBoost

If you're using Windows Vista, you can use ReadyBoost to speed up your system. A new concept in adding memory to a system, it allows you to use non-volatile flash memory—like a USB flash drive or a memory card—to improve performance without having to add additional memory. Learn more.

Taken from www.microsoft.com

Recent Comments

Partner Site :

Critics, Comments, Suggestion, Concerns

Computers Science Desktop PCs Laptops / Notebooks Network Internet Maintenance and Troubleshooting Cool Windows Guide, Tips and Tricks PC Games
Add to Technorati Favorites Top Blogs blogarama - the blog directory Computers Computers blogs Hardware Blogs - Blog Catalog Blog Directory
Search Engine Optimization and SEO Tools
Template by KangNoval & Abdul Munir | blog Blogger Templates